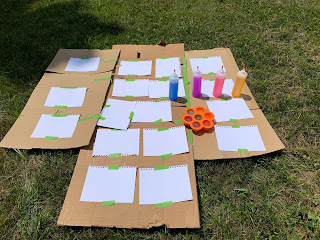
It was a day of trial and errors. Last night when I made the watercolor ice and watercolor bottles, I was very conservative with the watercolor. I still have nightmares about scrubbing Jude's tie-dyed skin from this activity, so I think that played into it. I also left my watercolor paper at home. Our first attempt was with way too diluted paint and mix media paper.
Q and Jude had a lot of fun moving the ice around the papers. Q is 19 months old and has pretty advanced dexterity, so we were able to let her do her own thing independently. She flipped the bottles over and squeezed them with ease and was also able to color on the paper with the ice. Jude is not as dexterous, so this attempt was most successful with him on my lap letting him guide the bottle as he squirted. He was able to move the ice around but his hands were just too small to hold it.
The first attempt ended in pretty pale colored paintings. Because I used so little color, it formed a ball in the ice and it really had to melt in order to work. The babies didn't seem to mind just playing with it, but it wasn't helpful in creating a vibrant painting.
Jude and I made a second attempt when we returned home. The ice is still freezing in the freezer, so I'm hoping to try that in the next day or two, but we were able to immediately do the watercolor bottles. I filled the bottles up less this time and put more watercolor in. We also used our watercolor paper.
To start, Jude had no interest in doing much other than crawling around the papers leaving knee trails on the paint. I let him do that for a while. When I switched on some music, Jude realized that he could use the bottles as shakers and paint would fly out. This was fun for him and since the colors were still pretty diluted, it didn't stain his skin. I just made sure to move the paper to the splash zone for his shaking.
Near the end, I realized that I could tape a word in frog tape and it would allow for the taped part to remain white. Since the colors were a little pastel like still, I outlined Jude's name when it wad dry to really help it pop.
I will be taking the art, cutting it into four pieces each, and turning it into another project for later on! It was a great day of trial and error and a fun way to beat the heat!
Watercolor Ice and Bottle Painting
Materials:1. watercolor paper
2. frog tape
for the watercolor ice:
1. silicone tray
2. water
3. liquid water color (we use these)
for the watercolor bottles:
1. water
2. liquid watercolor
3. condiment bottles
Directions:
for the watercolor ice:
1. fill trays to desired amount (we did about halfway because our molds were large)
2. squeeze two healthy squirts of liquid watercolor (more will create a more vibrant color but it more likely to stain skin)
3. stir
4. freeze
for the watercolor bottles:
1. fill halfway with water
2. squeeze in three healthy squirts of liquid watercolor
3. shake well
for the activity:
1. use frog tape to tape the papers down to cardboard (this step can be skipped with older children)
2. pop ice cubes out onto papers
3. hand children watercolor bottles
4. let them make a beautiful artistic mess!


No comments:
Post a Comment